从零开始,搭建一个简单的购物平台(十四)前端商城部分
本文最后更新于:3 个月前
从零开始,搭建一个简单的购物平台(十三)前端商城部分:
https://blog.csdn.net/time_____/article/details/108514710
项目源码(持续更新):https://gitee.com/DieHunter/myCode/tree/master/shopping
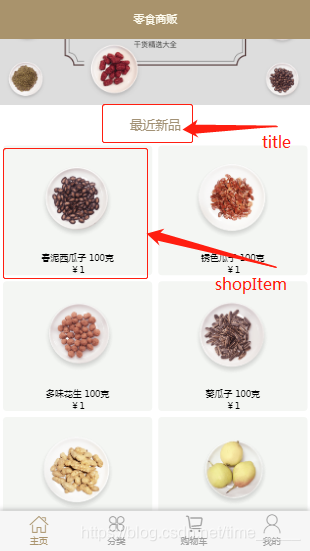
本篇文章介绍实现部分组件和首页部分,首页组件如下,首页中的数据通过分批异步加载,也就是每个组件的数据单独请求,减少数据请求堵塞,下面介绍一下实现过程

pageTitle(页面标题)
首先要考虑到标题的返回功能,在methods里写个路由返回函数
methods: {
   goBack() {
     this.$router.go(-1);
   }
 }
接着通过组件属性传参数(标题内容,是否有返回按钮),通过props将组件属性放在当前data中
props: ["title", "isBack"],- 标签中根据isBack决定是否有返回按钮,并显示title值
<template>
  <div id="top">
    <span v-if="isBack" class="back iconfont icon-fanhui" @click="goBack"></span>
    <span class="title">{{title}}</span>
  </div>
</template>
banner(主页轮播)
轮播图组件中的图片是单独请求的,所以用了model管理数据,bussiness进行请求,后面的组件有数据请求交互都是用这种写法

model.js内容,保存banner列表,vue实例,页面配置信息
export default class BannerModel {//banner数据存取
  constructor() {
    this._bannerList = []
    this._pageConfig = {}
  }
  static getInstance() { //单例写法
    if (!BannerModel._instance) {
      Object.defineProperty(BannerModel, "_instance", {
        value: new BannerModel()
      })
    }
    return BannerModel._instance;
  }
  set vueComponent(val) {
    this._vueComponent = val
  }
  get vueComponent() {
    return this._vueComponent
  }
  set pageConfig(val) {
    this._pageConfig = val
    this._pageConfig.picType = 1
  }
  get pageConfig() {
    return this._pageConfig
  }
  set bannerList(val) {
    this._bannerList = val
    this._vueComponent.list = this.bannerList
  }
  get bannerList() {
    return this._bannerList
  }
}
bussiness.js 做请求和逻辑处理
import Vue from 'vue'
import config from "../../config/config"
import BannerModel from "./model";
import Clone from "../../utils/clone"
const {
  DefaultPageConfig,
  ServerApi
} = config
export default class BannerBussiness extends Vue {//业务处理
  constructor(_vueComponent) {
    super()
    BannerModel.getInstance().vueComponent = _vueComponent//取到显示层vue实例
    this.initPageConfig()
    this.getBanner()
  }
  initPageConfig() {//拷贝分页默认配置,并且不更改原常量
    BannerModel.getInstance().pageConfig = Clone.shallowClone(DefaultPageConfig)
  }
  getBanner() {//请求处理,this.$crypto.setCrypto加密
    this.$axios
      .get(ServerApi.shop.shopList, {
        params: {
          crypto: this.$crypto.setCrypto(BannerModel.getInstance().pageConfig)
        },
      }).then(res => {
        switch (res.result) {
          case 1:
            BannerModel.getInstance().bannerList = res.data.list
            break;
          default:
            break;
        }
      })
  }
}
banner.vue页面展示
<template>
  <div class="swiper">
    <mt-swipe :auto="3000">
      <mt-swipe-item v-for="(item,index) in list" :key="index">
        <img class="imgs" :src="imgPath+item.shopPic" @click="clickHandler(item)" />
      </mt-swipe-item>
    </mt-swipe>
  </div>
</template>

<script>
import { Swipe, SwipeItem } from "mint-ui";
import Config from "../../config/config";
import BannerBussiness from "./bussiness";
export default {
  name: "banner",
  data() {
    return {
      list: [],//图片列表
      imgPath: Config.RequestPath//图片根路径
    };
  },
  created() {
    this.init();
  },
  methods: {
    init() {
      new BannerBussiness(this);//初始化banner请求
    },
    clickHandler(_shop) {//banner点击跳转
      this.$router.push({
        name: "ShopTheme",
        query: { _type: _shop.shopType, _shopName: _shop.shopName }
      });
    }
  }
};
</script>

<style lang="less" scoped>
@import "../../style/init.less";
.imgs {
  .h(500);
  width: 100%;
}
.swiper {
  width: 100%;
  .h(500);
}
</style>
tableBar(导航栏)
在iconfont下载相对应的图标字体资源,我这里直接下载在style目录下,用类名的方式显示,在tabbar文件夹新建model.js用于取数据(其实这个可以放到config)
export default class TableBarModel {
  static MenuList = [{
      name: "主页",
      path: "/Home",
      icon: "icon-shouye li iconfont"
    },
    {
      name: "分类",
      path: "/Kind",
      icon: "icon-fenlei li iconfont"
    },
    {
      name: "购物车",
      path: "/ShopCar",
      icon: "icon-daohang-gouwuche li iconfont"
    },
    {
      name: "我的",
      path: "/Info",
      icon: "icon-wode li iconfont"
    }
  ]
}
tabbar.vue ,通过列表
<template>
  <ul id="tab">
    <router-link
      v-for="(item, index) in menuList"
      :key="index"
      :to="item.path"
      tag="li"
      :class="item.icon"
      active-class="change"
      replace
    >
      <br />
      {{item.name}}
    </router-link>
  </ul>
</template>

<script>
import tableBarModel from "./model";
export default {
  name: "tabBar",
  data() {
    return {
      menuList: tableBarModel.MenuList
    };
  }
};
</script>

<style lang='less' scoped>
@import "../../style/init.less";
#tab {
  display: flex;

  box-shadow: -1px 0 8px #999;
  z-index: 100;
  justify-content: space-around;
  position: fixed;
  bottom: 0;
  left: 0;
  right: 0;
  .h(130);
  .bcolor();
  .li {
    .h(130);
    box-sizing: border-box;
    padding-top: unit(10 / @pxtorem, rem);
    width: 25%;
    text-align: center;
    .fontColorOff();
  }
  .li::before {
    .f_s(58);
  }
  .li {
    .f_s(26);
  }
  .change {
    .fontColorOn();
  }
}
</style>
title(标题)
title用h2简单做了个样式修改
<template>
  <div>
    <h2>{{title}}</h2>
  </div>
</template>

<script>
export default {
  props: ["title"]
};
</script>

<style lang="less" scoped>
@import "../../style/init.less";
h2 {
  .h2Font();
}
</style>
shopItem(商品列表)
新建model.js存放可读写商品列表,vue组件实例和默认分页配置
export default class ItemModel {//存放可读写商品列表,vue组件实例和默认分页配置
  constructor() {
    this._shopList = []//商品列表
    this._pageConfig = {}//默认分页配置
  }
  static getInstance() { //单例写法
    if (!ItemModel._instance) {
      Object.defineProperty(ItemModel, "_instance", {
        value: new ItemModel()
      })
    }
    return ItemModel._instance;
  }
  set vueComponent(val) {
    this._vueComponent = val
  }
  get vueComponent() {
    return this._vueComponent
  }
  set pageConfig(val) {
    this._pageConfig = val
    this._pageConfig.picType = 0//默认商品类型:单个商品
  }
  get pageConfig() {
    return this._pageConfig
  }
  set shopList(val) {
    this._shopList = val
    this._vueComponent.list = this._shopList//获取到商品列表后重新渲染
  }
  get shopList() {
    return this._shopList
  }
}
新建做业务处理的bussiness.js
import Vue from 'vue';
import config from "../../config/config";
import ItemModel from "./model";
import Clone from "../../utils/clone";
const {
  DefaultPageConfig,
  ServerApi
} = config
export default class ItemBussiness extends Vue {
  constructor(_vueComponent) {
    super()
    ItemModel.getInstance().vueComponent = _vueComponent//Vue组件实例
    this.initPageConfig(_vueComponent.shopType)
    this.getShopItem()
  }
  initPageConfig(_shopType) {//获取默认分页配置
    ItemModel.getInstance().pageConfig = Clone.shallowClone(DefaultPageConfig)
    ItemModel.getInstance().pageConfig.shopType = _shopType
  }
  getShopItem() {//获取商品列表
    this.$axios
      .get(ServerApi.shop.shopList, {
        params: {
          crypto: this.$crypto.setCrypto(ItemModel.getInstance().pageConfig)
        },
      }).then(res => {
        switch (res.result) {
          case 1:
            ItemModel.getInstance().shopList = res.data.list//渲染页面
            break;
          default:
            break;
        }
      })
  }
}
在shopItem.vue中进行列表渲染,并添加点击事件,跳转至商品详情页
<template>
  <ul class="more">
    <li v-for="(item,index) in list" :key="index" @click="clickHandler(item)">
      <img :src="imgPath+item.shopPic" alt :class="'imgs'+index" />
      <span>{{item.shopName}} {{item.shopScale}}克</span>
      <div>¥{{item.shopPrice}}</div>
    </li>
  </ul>
</template>
<script>
import ShopBussiness from "./bussiness";
import Config from "../../config/config";
export default {
  name: "shopItem",
  props: ["shopType"],
  data() {
    return {
      list: [],
      imgPath: Config.RequestPath
    };
  },
  mounted() {
    new ShopBussiness(this);
  },
  methods: {
    clickHandler(data) {
      this.$router.push({ name: "ShopInfo", query: { ...data } });
    }
  }
};
</script>

<style lang="less" scoped>
@import "../../style/init.less";
.more {
  li {
    .shopItem();
  }
}
</style>
最后的商品主题组件和商品列表相似,添加点击事件跳转至主题详情页
home页面
在page文件夹下新建home文件夹以及home.vue文件,将以上组件在home中引入并构成页面,效果如下

home.vue
<template>
  <div>
    <Top title="零食商贩"></Top>
    <div class="content">
      <Banner></Banner>
      <H2 title="精选主题"></H2>
      <Theme></Theme>
      <H2 title="最近新品"></H2>
      <ShopItem :shopType="shopType"></ShopItem>
    </div>
    <TabBar></TabBar>
  </div>
</template>

<script>
import TabBar from "../../components/tabBar/tabBar";
import Top from "../../components/top/top";
import Banner from "../../components/banner/banner";
import Theme from "../../components/theme/theme";
import ShopItem from "../../components/shopItem/shopItem";
import H2 from "../../components/h2/h2";
export default {
  name: "Home",
  data() {
    return {
      shopType: ""
    };
  },
  components: {
    Top,
    H2,
    Banner,
    Theme,
    ShopItem,
    TabBar
  }
};
</script>

<style lang="less" scoped>
@import "../../style/init.less";
</style>
以上就是主页功能实现及部分公共组件的实现,下篇文章将对商品分类列表,商品主题界面及功能进行介绍
本博客所有文章除特别声明外,均采用 CC BY-SA 4.0 协议 ,转载请注明出处!